

4 Halloween Science Projects for Kids
Giant spiders. Skeletons on horseback. Pumpkins on every stoop! Our favorite spooky holiday is just around the corner. So we’ve got four Halloween science projects to set the mood and keep your little ones entertained as temperatures start to drop.
Halloween is an excellent opportunity to teach your kids about science. Seemingly simple decorations can become engaging projects. Here are the science projects we’ll undertake today:
Project 1: Dry Ice Witch’s Cauldron

We’ll start with making a simple foggy witch’s cauldron. This cauldron makes a brilliant decoration, and kids have a lot of fun watching it come to life.
The instructions are straightforward, but you will need a ‘cauldron’ and dry ice.
Supplies you will need:
DRY ICE WITCH’S CAULDRON:
- 2 Liter Plastic Container
- Hot Water
- Dry Ice
- Towel
- ‘Cauldron’
- Hammer
- Heavy Leather Gloves
Dry ice is so cold it can burn you if you aren’t careful. You will need a pair of heavy leather gloves if you plan to handle the ice with your hands.
Most people can find dry ice in local grocery stores near the front of the store. Some Wal-Mart stores carry it, so you might check there to start.
Once you have your dry ice, you’ll want to lay it out on a towel and bust it up into smaller chunks with a hammer (assuming it didn’t come in small pieces already).
Wearing the leather gloves, place some chunks of dry ice in the bottom of your cauldron.
Use your plastic container to slowly pour hot water over your ice chunks in the cauldron. The dry ice will almost instantly create a fog.
Pro Tip: You can let your kid do the pouring if they’re old enough. They’ll love it!
After a while, the water will start to cool. You can pour the cool water out and replace it with more hot water to keep your fog going.
Project 2: Static Electricity Ghosts
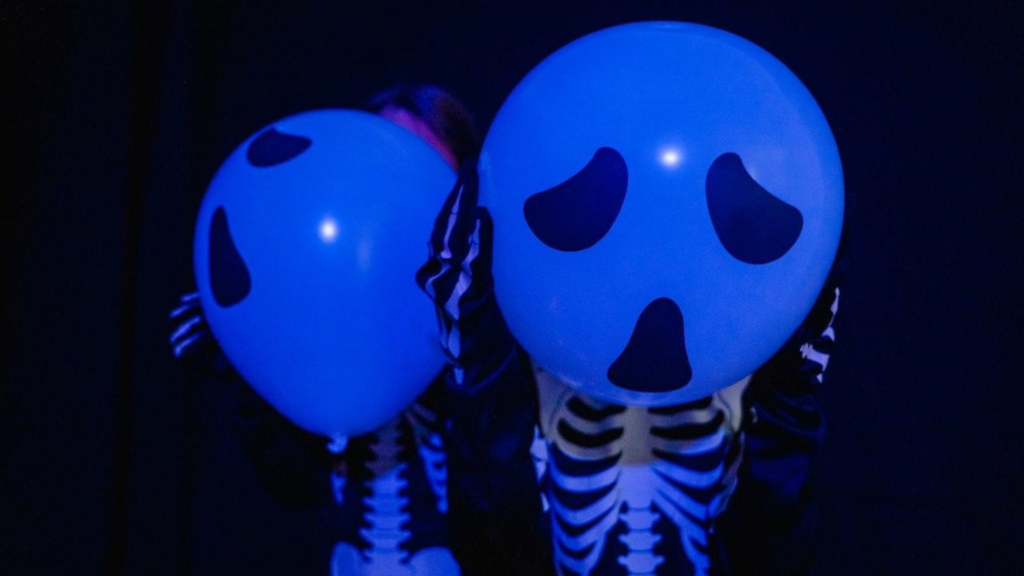
Another Halloween science project that’s always popular with kids is static electricity ghosts.
Essentially, you inflate a balloon, draw a ghost face, and then use various materials to experiment with static electricity.
Supplies you will need:
STATIC ELECTRICITY GHOSTS:
- At least 2 white balloons
- 1 Sweater
- Markers
- Tissue paper
- Cardboard
- Aluminum foil
- Yarn
- Pom Poms
- Pipe Cleaners
- Ribbon
- Cloth
- Foam
Start by inflating your white balloons. Once they’re blown up, use black markers to give them a face, mouth, and any other ghost parts.
Now rub one of the balloons on the sweater to build up static electricity.
Next, touch each balloon to the other materials, such as the aluminum foil and pom poms, so your child can discover what happens.
Using ghost balloons can teach your kid about static electricity, conductivity, and how a balloon can hold a negative charge.
Ask your child questions to get them involved and to help them understand what is taking place when items are either attracted to the balloon, repelled by it or when nothing happens at all.
For even more fall STEM projects check out this iCode School article.
Project 3: Germinating Pumpkin

Dirt, decay, and pumpkins. What more could a child ask for from a Halloween science project?
Germination is the process of sprouting a seedling. In this case, we’re sprouting pumpkins, and we’ll do it inside another pumpkin.
It’s kind of like creating Frankenstein when you think about it.
The cool part is you get to teach kids about plant life. Not just the life part but also how to grow and care for that life.
Supplies you will need:
GERMINATING PUMPKIN:
- Small pumpkins (the tiny ones)
- Dirt
- Water
- Knife (to cut the top of the pumpkin off)
First, an adult should cut the top of the mini pumpkin off with a knife to reveal the pumpkin’s ‘guts’.
Since pumpkins already have seeds, you don’t need to bring any. Some people do use seed starter, but it probably isn’t necessary.
Okay, now you’re going to fill the inside of the pumpkin with dirt (and by *you* we mean your kid).
Once it’s filled up, you can water it lightly and then sit the pumpkin somewhere it will get sunlight.
Water it once a day, and within a week or two, you’ll start to see changes!
One of the first changes you’ll notice is that the original pumpkin is rotting. However, as the old pumpkin rots away, a new pumpkin is born and sprouts up out of the dirt!
Amazing!
It’s a bit of a slow burn, but that’s also a lesson in patience, so the wait is kind of a bonus.
If you liked this project and you want to give your child a deeper STEM foundation, take a look at all that iCode School has to offer!
Project 4: Squishy Monster Eyes

For our last Halloween science project, we’ll switch gears and get extra spooky with monster eyes!
Many of you made these as kids, but even if you didn’t, you can still experience the joy of doing it now with your kids.
For this one, hand your child a raw egg.
Ask them if they can remove the eggshell without making a mess.
Naturally, they’ll say you’re out of your mind (and that’s where the fun begins).
Supplies you will need:
SQUISHY MONSTER EYES:
- Eggs
- Vinegar
- Mason Jars
- Food Coloring (Halloween colors)
- Large bowl
- Tablespoon
- Towel (to clean up messes)
First, set the egg down in your mason jar or cup.
Next, pour vinegar over the top to fill the container enough that the egg submerges (if the egg floats, that’s okay).
Now add your food coloring. Gently mix it in with a spoon or stirrer if you like to ensure it evenly distributes.
Almost immediately, carbon dioxide bubbles will start to form on the egg’s shell as a chemical reaction begins.
Let the egg sit in the vinegar for 24 hours, and then replace the liquid with fresh vinegar. Now let the egg sit for an additional 24 hours.
It is important that you allow the egg to sit in the vinegar for 24 hours each time so the process can reach completion.
After 48 hours have passed, remove the egg from the vinegar, and rinse it off.
It’s ready!
Let your kids squish it, bounce it, and play with it (until it inevitably falls from a table and breaks on the floor)!
After Halloween Science
Even when Halloween is over, you can still get your kids involved in fun science projects.
iCode School was explicitly designed for that purpose.
Our instructors work with kids daily on unique science, technology, engineering, and mathematics projects to help them learn and grow.
Kids learn from hands-on experience and alongside other children just as interested in science projects as they are!
To learn more about what iCode School can do for your child, click here to explore our site now.
Recommended Blogs
Why Minecraft Is More Than Just a Game for Kids
Minecraft is often seen as just another video game, but for many children, it’s much more than that. Beneath its blocky graphics lies a powerful platform that encourages creativity, problem-solving, and even early coding skills. For parents trying to balance screen time with meaningful learning, Minecraft offers a unique opportunity to turn play into productivity. A Digital Sandbox for Creativity Unlike traditional games with fixed goals, Minecraft gives children complete freedom to build and explore. Whether it's constructing cities, designing machines, or recreating real-world landmarks, kids are constantly using their imagination. This type of open-ended play helps develop: Creative thinking Spatial awareness Planning and design skills Problem-Solving in Action Minecraft challenges kids to think critically. From gathering resources to surviving in different environments, players must make decisions, test ideas, and adapt quickly. These experiences help children develop: Logical reasoning Decision-making skills Persistence through trial and error Collaboration and Teamwork In multiplayer mode, kids can work together on projects, solve challenges, and build shared worlds. This encourages: Communication skills Teamwork Leadership Introduction to Coding Concepts Minecraft also introduces basic coding logic through features like Redstone (in-game circuits) and modding. Kids begin to understand: Cause and effect Sequences and logic Basic automation…
How To Improve the Use of AI in Education
Artificial intelligence is already in your child's classroom, whether you realize it or not. Adaptive math apps, grammar-checking tools, automated grading systems, and AI-powered tutoring bots have quietly become fixtures of the modern educational landscape. But here's something most parents don't hear: schools are barely scratching the surface of what AI can actually do for learning. The gap between how AI is being used and how it could be used is where the real opportunity lies for your child. How AI Is Being Used in Education Right now, most schools use AI in fairly basic ways. The most common applications include: Adaptive learning platforms like Khan Academy and DreamBox adjust difficulty based on student performance. Automated grading for multiple-choice tests and some written assignments. Plagiarism detection tools like Turnitin. AI tutoring chatbots that answer student questions on demand. These are helpful tools and represent genuine progress, but most of these applications treat AI as a faster version of what already existed. Adaptive software is a smarter worksheet. Automated grading is a faster teacher's aide. Chatbot tutors are searchable textbooks with better conversation skills. The way most schools deploy AI is reactive. It responds to what a student does, but it…

Kids and Technology: Why Monitoring Matters More Than Ever
Helping parents guide screen time with safety, boundaries, and balance Technology isn’t “coming.It’s already here - in your living room, in your child’s backpack, and sometimes even under their pillow at night. Kids use tablets for homework, watch YouTube for entertainment, and play games that let them build, explore, and connect with others. When used intentionally, technology can build creativity, confidence, and real-world skills, especially in structured programs like our coding classes for kids — technology can build creativity and confidence. But here’s the reality: Children are stepping into digital spaces that were not designed with childhood in mind. As Spider-Man wisely said, “With great power comes great responsibility.” That applies to superpowers — and it absolutely applies to devices, apps, and online platforms. Monitoring isn’t about fear.It’s about guidance. Monitoring Isn’t Spying, It’s Parenting in a Digital World When parents hear the word monitoring, it can sound extreme.Reading every message. Hovering constantly. Controlling every click. That’s not what healthy digital parenting looks like. Monitoring simply means staying involved. It looks like: Knowing what games and apps your child uses Understanding what features are turned on (especially chat and friend requests) Checking in consistently, not just once every few months…